Monday, February 27, 2012

What have I done? The ugly truth under the shoes

Tonight, when the boys were running around like maniacs, Saga pulled his left front shoe. It's the first time I've seen the bottom of his foot in about three months (bad owner, not here for farrier).

 This is his LF today after he pulled his shoe off. At least he didn't manage to rip any hoof wall with it.

This is his LF in November, the day he got shoes.  See any really frickin' obvious differences?

Despite aggressive rasping of the lower hoof wall, despite remedial farrier work, I swear that from this view his feet look WORSE now than they did five months ago. Yet, Saga is sound now and wasn't then.

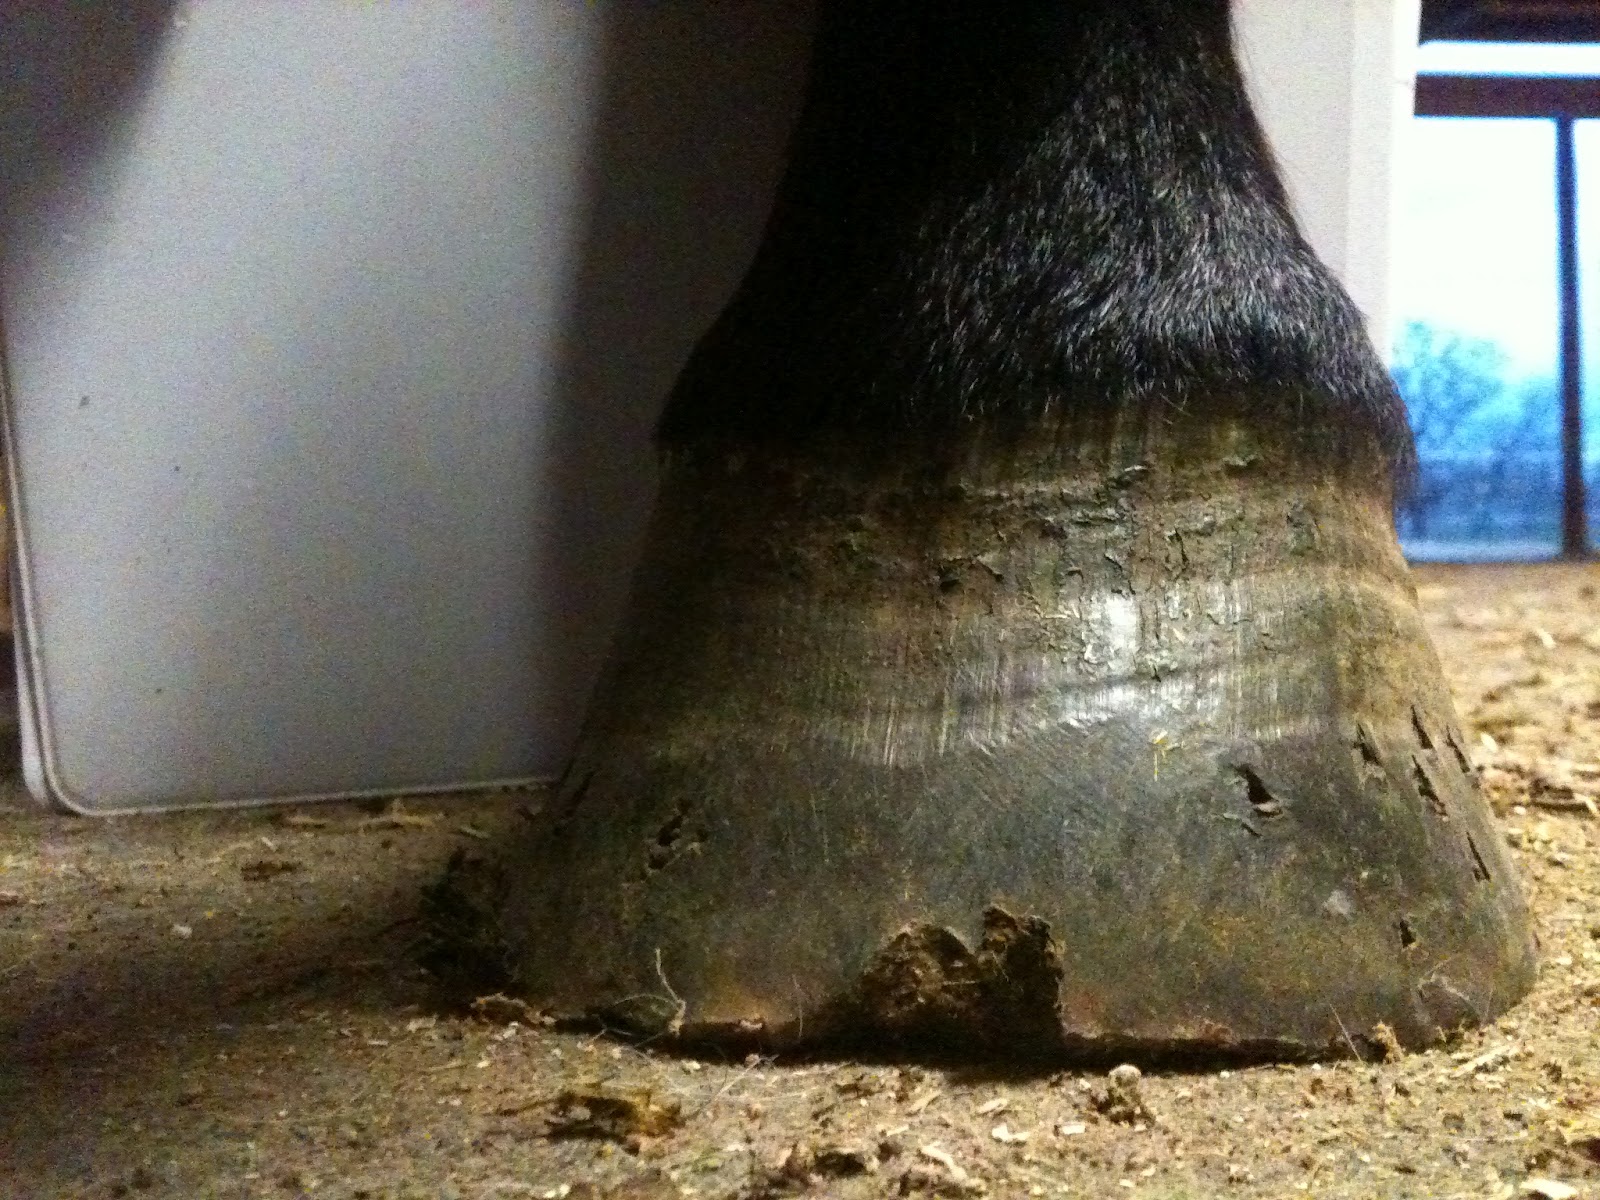
 Today. Look at the indent at the top of the hoof where the growth is constricted, the pushed-up quarters, and the impressive flaring on the outside. Oh, and he STILL has event lines, probably from shoeing.

 Last November. No flare, no indent at the top.

 The bottom of the foot shows the flare in spades. That's a 3/4 inch deep/wide gap between the hoof wall and the sole. Look at that enormous hunk of false sole he's got on his toe.

 And of course the hoof wall is hugely built up. You can see where the false sole is trying to shed too.

No caudal hoof, atrophied frog, and tons of hoof wall on the front quarters, although his toe is very short (I'm guessing due to the clips). In fact it sort of looks as though the shoe went OVER the toe callus?

The sad thing is that this is a sound hoof, in a shoe.

So, what to do. I guess I've sort of known that his feet were deteriorating bit by bit... I've been watching the caudal hoof shrink and watching to his landing change to toe-first. But he's sound, so I've ignored it. Ignorance is bliss, right?

Do I call my farrier and have him put the shoe back on? It's been 28 days since Saga was last shod, and his feet... look like this. Do I call the "farrier" from down the street and have him pull the other shoe, and try barefoot again? I had planned to do this eventually but was waiting till the summer heat when I won't ride much, rather than doing it now. I had also planned to do some changes to the track to make it more barefoot-friendly before pulling his shoes, but haven't been able to due to the rain we've been having (yay rain!).

In addition, Saga is supposed to joust at a competition in May, and I need to keep him sound for that - barring unforeseen circumstances, of course. Does that mean shoes, or will he be OK barefoot? I guess I won't know if I don't try. 

I have a vet appointment for him later this week for annual shots and such, so I can have his feet re-xrayed then to see if the sole depth has changed. But once that false sole is removed, I'm guessing the answer will be that sole depth is the same as it was in November. For whatever metabolic/footing reason, I think Saga just isn't a horse who grows much sole. In fact, I was looking back at his pre-purchase exam from four years ago, and the vet mentions that he "would like to see more sole". I didn't have a clue what that meant at the time, but now a statement like that sure as heck would raise all kinds of red flags.

For tonight, I stuck an easyboot on the LF and gave Saga an extra alfalfa cube treat. I'll sleep on things and see how I feel about it in the morning. 

What would you do if Saga were your horse?

Thursday, February 23, 2012

88

Today's high was 88F, which is 31C for everyone else in the world. It's February. WTF?

The boys were HOT - they've still got most of their winter fuzzies on, although shedding has commenced with a vengeance. I actually came home from work a tad bit early with plans to bathe Cash (I swear there's a white horse under the mud, or at least I think there is) but decided that he'd probably rather be out grazing with the other boys. So the boys did their best impersonation of riding lawnmowers while I raked spent hay and gave it to the chickens, spread composted manure, and generally tidied up. After the boys ate dinner, I gave Cash a good grooming, trimmed some of the more impressive shag off his legs and from under his chin, and fed him a dozen extra cookies 'cause he's so cute.

We didn't joust last weekend since my in-laws were in town and we went camping with them, which was lovely. Last night we did our regular jumping lesson.  I am getting much better at trusting Red to find a spot (it's always the short spot, which I have a hard time waiting for) and staying with him no matter where he jumps from. I'm still popping up over the top of the fence more often than not, but occasionally I manage to stay down and not have my saddle hit me in the butt. I'm able to keep the heels down and shoulders back in front of the fence, and I'm getting better at riding OVER the fence instead of just letting Red dive over it. I've still got a long way to go, but I can feel it getting better week by week.

This weekend there's a dressage clinic that I'll be going to. I seriously need to dust off my dressage saddle for this - I haven't ridden in it in faar too long! Fortunately I know the instructor very well so she'll be kind to me. I plan to do a longe lesson one day, 'cause I need all the help I can get on position. Hopefully the second day I can ride Saga and work on some things (like why he's not through the bridle, and why our canter transitions suck) that have been challenging me for a while.

Tuesday, February 14, 2012

Post-constructivism

I am still patting myself on the back for the title of this post*.

See, this weekend we constructed a post. So it was a post-constructivist weekend. Ok, we actually fixed the post - one of the four cedar posts holding up the porch roof on the guest house.

 
Here's the problem - the post had rotted out at the base.

 To start the repair project, we used a 2-ton jack and a leftover board from the barn construction to prop the corner of the roof up. When we did this, the entire post broke free from the concrete base. Oops. Good thing we were fixing it?

 Close-up of the jack. These things are really handy, and I used this one before to prop up the shed roof when it collapsed. (Dang, that post is embarrassing. We used to keep the boys like that!?!?)

 Next, we took a saws-all and chopped off the rotted base. That's when we discovered that the posts had barely been set into the concrete, instead of several inches into the slab. When you think that this is what's been holding up the roof for 60 years, it's impressive to think how long it lasted.

 We then used a hammer drill to drill a hole in the slab. Drilling into cement is one of those jobs where you need a hammer drill.  Buy a good one (our is a Bosch, which I would definitely recommend).

 We fitted the support base over the cement and placed the Red-head bolt (for real, that's the brand) into the cement.

 Here's what it looked like after we'd pounded the bolt in with a mallet - all nice and fastened. This baby isn't going anywhere.

 Next, we measured a block of 4x4 to slot into the base, cut it to size, and slid it in place.

A bunch of Deckmate screws and hurricane straps to hold everything together, and volia! Good for another 60 years at least. We'll build a little base around each post to hide our handiwork, but otherwise this is done. I even gave it a few good shoves to make sure it's in place.

PS. Hubby says this is really more post-repairism than post-constructivisim. Pffft. He's no fun.

* Post-constructivism info can be found here. I especially like how the columns are simple, like ours. :)

Sunday, February 12, 2012

Jousting practice cancelled due to SNOW!!!!

Yep, that's right, it snowed in parts of central Texas today. In the middle of the day, no less! It was fine at our house when we left, but shortly after we pulled into our friend's house (about 20 miles to the northwest), it started sleeting heavily. I was concerned about the condition of the roads, especially pulling a trailer, so less than 20 minutes after we arrived, we turned around and came back home. Just as we left their house, big, fat, white flakes of snow started coming down.

Hubby took this picture out of the window of the truck. Those blurry white blobs in the middle of the picture are snow. REALLY!

Both Bre and Fuzzypony chose today to accompany us, so since the weather was decent when we got home, we tacked the boys up and went for a ride. I think we put in 5 miles walking up and down the road, hubby in his armor. He took along a jousting lance and practice raising and lowering it to strengthen his arm, and also discovered some interesting details about where he needs to couch it (i.e. hold it under his arm) for maximum control. It was good practice, even if we weren't actually able to joust today. 

I'm pretty sure Bre thinks we're crazy now (as if there was any doubt?), so I am interested to see what she will do with the pics and video she took today. Keep an eye on her blog to see!

Saturday, February 11, 2012

Dr. Cook's bitless bridle? Red says...

At our lesson this week, I decided to try out the Dr. Cook's bitless bridle that's on loan from Bre over at G is for Greta. I had really wanted to try it on Saga, but it doesn't fit his big lug-head, so we tried it out on Reddums instead. Putting it on required a little creativity on my part and a little cooperation on Red's part (nose goes here), but we got it. It looked quite handsome on him, I must say.

Normally I ride Red in an eggbutt snaffle for hunting, jumping, or dressage, and a mechanical hackamore on the trails or for jousting. When we bought him, he was going in a 7 inch shanked bit (because, you know, he's gaited, and that's a gaited horse bit. Whatevs.) Red stops entirely on your seat, and he's definitely not one to run off with you, so we use as little hardware as possible. However, his hackamore is the most hideous thing ever kind of ugly, so I figured if he would go in the Dr. Cook's bridle, it would be nice.

 Photo courtesy of Dover Saddlery.


Pretty much from the start, it was clear it wasn't going to work. Red is usually quite noodly (riding a straight line is more challenging on Red that any other horse I've ever been on), so having quiet hands is a must. With the rings where the reins attach flopping around and thereby putting pressure on his face, his head was all over the place. If I tried to take up enough contact so the reins would stop flopping, he got really tense and gaited, which is his usual response to too much contact. I usually ride him with the absolute lightest contact, so this makes perfect sense. We tried WTC in both directions just to be sure it wasn't a fluke, but poor Reddums just kept getting whacked with the reins. After only 15 minutes, I switched him back to his regular snaffle. Fortunately, Reddums forgave me for trying out the newfangled hardware on him, and went back to being his usual self within a few minutes.

I do think a Dr. Cook's would work well on a horse that is not as sensitive or noodly as Reddums. It's a handsome-looking bridle and I like how it works. So if anyone is looking to purchase a very gently-used Dr. Cook's bridle, contact Bre.

Red promises he didn't slime it or anything.

Thursday, February 9, 2012

Trouble with a capital T

When we moved out of the suburbs and into our small town, we were so glad to be done with HOAs (home owner's associations), nosy neighbors, and the like. What we didn't know at the time is that people who live "in the country" are about the nosiest people on the planet.

Only a few months after moving, we knew almost everyone on our mile-long street. People here are super nice, but they are also incredibly in-your-face. They know where you work, they'll ask about your latest remodel project, the car that's occasionally parked in your driveway, when your in-laws are coming back to visit, how your horses are doing, etc. etc. etc. It's nice that they care, but a little privacy would be good too!

Still, we are respectful. We are polite. We work hard to fix our place up, because it was really not in great shape when we bought it. We want it to look nice, because we want to live in a nice place that we are proud to call home. We are especially conscientious because we have four horses on small acreage. I muck at least 2x/day, including barn, pastures, and track. We keep some manure in a small compost pile (for the garden), but most of it goes into a special trailer, which we keep covered with a tarp to limit the smell (and bugs). We haul it off weekly to a couple that is using it to terraform their property. The horses are on a feed-through fly control, plus we have traps out. We'll put out fly predators too when it gets a bit warmer. Our pastures are carefully grazed, and we've reseeded them as needed. When it rains, I keep the horses in the barn so they don't create a muddy mess out of the land.

In short, we work our butts off to keep our place nice. We try really, REALLY hard not to be the cause of any complaints with our neighbors. So you can imagine our upset when a member from the city environmental council called to inform us that someone had suggested that an ordinance be passed limiting each property to one horse. What's worse is that this was suggested by a fellow horse owner on our street (who happens to have one horse).

Of course, there was more to the story. It turns out that a neighbor two houses down brought home four horses and stuck them in a pasture in his backyard just before the winter rains started. In a matter of days, they were up to their hocks in mud, the pasture wasn't being mucked, and with the warm weather we've been having, the flies and the smell were awful. Their neighbor behind them, who owns one horse, as well as their next-door neighbor, were understandably upset by this. Since this is a small town, they took their complaints directly to the mayor, who in turn brought it up with the city council. Awesome.

The icing on the cake is that the guy has a huge 6 horse trailer, and the way he has to park is so that it's on his driveway (and not in the mud), it's the first thing you see when you turn onto our street. Apparently that's been a compliant too, so now there's an item for the next city council meeting to limit trailer and RV parking.

The city actually does have rules in place governing animal ownership, which basically state that the animals must be cared for properly. It's an open interpretation to what "properly" means, of course. However, I'm hoping that by us demonstrating that horses can be kept tidily on small acreage with minimal impact to the land, the city will take exception with our neighbor and require him to clean up his act.  It's certainly a better solution than passing ordinances or zoning that would affect all horse owners in the city - namely, all the rest of us that are not a source of contention with our neighbors.

The council meeting is "sometime in March", and you can bet your socks we'll be there to defend our right to keep our horses at home. After all, that's why we bought this place and have been working so hard to make it our little dream farmlet. I'll be damned if we're going to let someone ruin it for us.

Tuesday, February 7, 2012

Certified jousting pony Part II

At our jousting practice yesterday, after hubby and Saga warmed up on the quintain, we had to switch out some gear to be safe for balsa jousting.

Let me explain: we do two types of jousting. The first type, which we call "foam jousting," uses an 8 foot lance with a styrofoam tip. The lance itself is comprised of a 3 foot solid wood base, a 5 foot cardboard tube (the type they roll bolts of fabric on), and finally a 2.5 foot styrofoam tip. This lance design was the first that we tried back when we started jousting, and the idea with using the cardboard tube as the body of the lance was that it would fail (crush) if the hit was too hard. It also takes very little force to break the tip of the lance, and there are no sharp splinters like a balsa tip lance produces. Therefore, the armor requirements for this type of jousting are minimal: a helm with no larger than 3/4 inch holes, body armor (an eventing vest works great for this), and protection for your throat.

 Believe it or not, that's me in there, and this getup works for foam jousting. I've got an eventing vest on under the gambeson and surcote, and the helm with the bar grille is perfectly safe.

The second type of jousting is balsa jousting. This uses a roughly 11 foot lance, including a 3 foot scored balsa wood tip (the tip is scored for easier breaking). The lance itself is solid hardwood down to ferrule where the balsa tip sockets in. It can take a significant amount of force to break these lances, and there can be sharp splinters that go flying on impact. Therefore, the armor requirements for this type of jousting are much more stringent: full body armor, arm and leg armor, double layer throat protection, groin protection (the saddle can help provide this), and a helm with openings no larger than 1/4 inch.

 Here's what a balsa lance looks like. The red part is the balsa tip, the rest of it is hardwood. Photo courtesy of Historic Enterprises.

Originally we had planned to joust with foam for Saga's first hits, but we discovered that there were no foam tips to be had. In addition, the cardboard tubes on the lances designed to accept foam tips had gotten wet, and were failing. So, we decided to go ahead with balsa lances, but we had to do some armoring up.

In case you're wondering how much full jousting armor weighs, it is very much dependent on the time period your armor is and how big you are. Full plate armor (c. 1500s) weights upward of 100 lbs. Hubby's armor (c. 1380) probably weighs in around 80 lbs. R, who was riding Red and doing the hitting, and N, who was providing ground crew assistance, discuss how much R's helm weights:


Hubby had to change out his face plate. Different face plates for the same helm were done in period - after all, it was expensive to make a helm, so being able to use it for different purposes was important!

 Step 1: release strap that holds the bar grille faceplate on.

 Step 2: Unscrew the hinge.
 No faceplate.

 Step 3: Put the new faceplate on (this style of faceplate is called a Klappvisor, it's German) and screw on the hinge.
 Its important to have good ground crew who know what they are doing! Note that there is also someone holding the horse while all this is going on.

 Finally, refasten the strap that holds the visor closed.

Although there are no worldwide jousting rules, the general accepted largest opening on a helm is 1/4 inch. This is to prevent any shards from the lance from penetrating the helm. And in case you're wondering, this is a real concern - the King of France died in a jousting accident when a lance shard went into his helm. Thanks, but we don't want that happening here.
1/4 inch openings mean that those tiny eye slits are all you get to see out of. You can also start to see why the chain mail aventail attached to the helm is so critical - it protects the neck and throat region from the lance. Note the skidmarks on the shield - those are from lance tips that strike and skid off. The shield is curved to deflect blows away from the rider.

If you put your hand about halfway up the bridge of your nose, you'll have some idea of what you can see in this helm. You can't see your horse's ears, and you often can't see the tip of your lance when it hits your opponent's shield. The jousters are frequently dependent on ground crew to help turn their horses and line them up on the lane because they can't see to do it. They cannot see their hand to take a lance either - they literally put their hand out, and the ground crew must put the lance in the jouster's hand. Sometimes the horse is skittering around during this process too, since some of them get really excited to charge down the lane (Red, for example).  It's really a team effort to get the jouster off down the lane, with all equipment in working order!

But the team effort pays off... it's sort of anti-climactic, but here's how practice ended:


And because Bre makes waaaay better videos than I do, I am shamelessly posting the video she made from practice:

The full-sized video (in HD no less!) is available over at her site, G is for Greta. If you think this video is as cool as I do, please visit and tell her what you think! Thanks Bre!!!