Showing posts with label kitchen. Show all posts

Wednesday, January 2, 2013

First project of the new year - the kitchen sink!

Our house boasts the original enameled cast-iron kitchen sink and bathtub.  While enamel is one of the most long-lived surfaces for such items, it does eventually get scratched and lose its polish. There are about a million Google search results for how to re-enamel an enamel tub (this involves using enamel paint over the existing finish), but unfortunately the previous owners of our house apparently didn't do their homework before slapping on a coat of (some sort of) paint over the sink and tub.

 
You can see the paint flaking off, and the original enamel finish underneath it.

In addition, years of being wet caused some of the grout on the edge of the sink to fail, loosening some of the tiles.

We started the project by removing as much old caulk and grout from around the edge of the sink. A utility knife and a window scraper (straight razor blade) worked well for this job.

Next, we pulled out the (old, disgusting, loose) faucet. We considered replacing it, but couldn't find any faucets that would look nice in a 50's farmhouse kitchen, AND didn't cost an arm and a leg, so we just cleaned this one and replaced it.

Next, we used Orange paint stripper to remove all the paint on the sink. You can see here how it made the paint loosen and bubble up.

We chose this stripper because it's fairly mild, and we didn't want to damage the underlying enamel any more than it had already been damaged. We tested a small section to be sure it wouldn't stain or damage the enamel first, and then went to town. (P.S. wear gloves when you use this stuff. It's not as toxic as some but it's not something you want to get on your skin.)

After scraping off all the paint and orange goo,we wiped everything down with odorless mineral spirits (again, wear gloves!) and began reassembling things.

We used an adhesive caulk to stick the tiles back in place.

We caulked the rest of the sink with a tub and tile caulk. Hubby applies the caulking; my job is to go behind with the "magic caulk finger" and make everything neat. I advise using gloves and lots of water and paper towels.

After the caulk had dried for about two hours, we reinstalled the faucet. Then we went over any grout lines on the tiles with a sanded caulk - it looks like grout but works like caulking. A lot of the grout really needs to be replaced entirely because it's gotten flaky and "rotten", but without scraping it all out (and risk damaging the tiles), using the sanded caulk was the best we could do.

Ta-dah! The "new" kitchen sink! I still need to clean the grout on the backsplash and scrub some stains on the old enamel, but it looks about a million times better!

We had originally planned to refinish the sink "properly" with enamel paint, but it seems that even the best paint jobs (done by pros, using spray enamel) only last 3-5 years. After stripping the paint off the sink, we decided that the original enamel really isn't that bad - sure, it doesn't have it's original shine, but it looks like what it is - and antique farmhouse sink. We're good with that. :)

Next up: the bathtub!!!

Tuesday, March 20, 2012

Weekend kitchen remodel

We've done a lot of remodeling work on our house, but one of the areas we've put off has been the kitchen. The idea is that eventually, we'll put a small addition on the back of the house and expand the kitchen, so we didn't want to waste any time or money on updating the kitchen before we're ready to do the addition. It's still a couple of years off - after the kids get out of college.

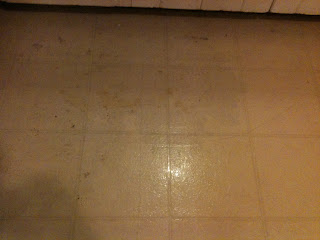
I've been trying to live with the kitchen, but a couple of weeks ago, I decided I absolutely could not live with floor anymore. It's white linoleum, covering a couple of layers of paint, covering the original oak floor. Eventually we'll refinish the wood, but again, not until we do the addition. Even so, I couldn't take the linoleum any more.

I know, you're thinking, "how bad can the floor be?" Let me 'splain:

 
It used to be white, but now it has spots and all sorts of random stains that do not come off when cleaned. Gross.

The kitchen originally had a half-wall in the middle of it, and they pulled out the wall after they put in the linoleum. That left a big hole in the linoleum. Great place for dirt to get trapped.

Here's a close-up of the hole. Don't you want something like this in the middle of your kitchen?

As an extra added bonus, the linoleum was peeling up around the edges, especially around the door.

We went through a couple of options for the flooring. The linoleum is really easy to peel up, which will be great when we get around to refinishing the floor. We wanted something that would look better than more linoleum, that would go on quickly, but was fairly cheap. After getting advice from a couple of folks (thanks Funder), we settled on a vinyl stick-down tile that was groutable. At $0.99/sq foot, the price was right too! 

To prep the floor, we filled the hole with a spare block of wood and leveled it out as best as we could. 

We peeled up the loose linoleum back to where it was well-stuck to the floor so that we'd have a more solid base to work on.

You can get an idea of the layers of goo that are on the floor under the linoleum. We definitely have our work cut out for us when we refinish the floor!

And then... we stuck down the first tile!

We kept sticking down whole tiles, using 3/16 tile spacers to make sure we laid them evenly. Freya supervised.

Here's the floor with all of the whole tiles. The little dots on the corners are the spacers.

After all the tile was laid, we grouted.

And here's what it looks like done!

While I was at it, I repainted the kitchen from a sickly greenish-offwhite to a bright blue.

I think it goes pretty well with the awful yellow tile countertops... definitely provides a good contrast!

It's not the best remodel ever, but it's a whole lot better than it used to be! I think we can live with it for another few years without being hugely embarrassed by our kitchen. :)

It took the hubby and I three hours on Friday night, then another few hours Saturday morning, to cut, lay, and grout the majority of the tile. It took me another solid day (by myself, hubby was gone) to finish cutting and laying the remaining tile, grout it, cut and install quarter-round molding, and paint. Not bad for a weekend project, and the entire thing cost us less than $300!

The only thing left to do is make some curtains for the kitchen window. I want to go with a fabric that has both blue and yellow in it, so it's either this one (kinda busy, but maybe cute for a country kitchen?)

Or this one... just because I can! What do you think?

Sunday, January 17, 2010

Fun (haha) with plumbing

Over the holidays, we were gone visiting family and had turned off the water to the house and drained the pipes. A big part of why we chose to turn the water off was because we weren't certain that we had done the plumbing for the bathroom fixtures correctly and didn't want them to leak while we were gone. We ended up leaving the water off until yesterday, which turned out to be a good thing because last week we had three days of weather where it didn't get above freezing. We had three friends with burst pipes, but both of our houses came through just fine.

Or so we thought. Today, we had turned on the water to mix mortar and whatnot, and things seemed fine. About 30 minutes later, the husband was showing his sister (who is in town visiting) and her SO around the property, and they happened to include a tour of the guest house... where he found water fountaining from under the kitchen sink. Awesome! Apparently, even though we had turned off the water to the house and drained the pipes there, we didn't drain the water in the pipes in the guest house. With the freezing temperatures, a pipe had burst somewhere in the wall behind the kitchen sink. We quickly turned off the water to the house again and decided to deal with the mess later. After all, we plan to gut the kitchen in the guest house sooner or later - with the termite damage in the walls and the floor with the impressive topography, we expect to have quite a lot of work to do there. I guess we'll be replacing the plumbing there too. Sigh. We also want to install a cutoff valve for the guest house water so that we can shut it off independently of the main house. Of course, first we have to FIND where the water comes into the guest house first...

Back at our current house, we had a rather nasty backup in the kitchen sink drain. After pulling out the p-trap and finding nothing, we got out the toilet plunger and went to town. One of the kiddos helped the hubby while he plunged.

One technique - using a toilet plunger to unclog your drain.

Although we eventually got the sink to drain, we discovered about 5 minutes later that it had backed up into the laundry area in the garage. We had nasty, disgusting gunk from the drain all down the wall where the laundry drain is and under the washing machine. The husband and I spent the next half-hour cleaning up the muck and hosing out the garage. Fortunately, the nastiness didn't spread too far in the garage, but it was still really gross. Unfortunately, our garage still stinks and so does our backyard where we hosed everything out. We've put out vinegar and sprinkled baking soda everywhere, so hopefully the stench will clear up soon.

I believe out next trip to Home Depot may include the purchase of a pipe snake so we can finish fixing the clog. The sink drains, but it's still not totally right. Oh well, I guess we'll add amateur plumbing to our list of talents!