Tuesday, January 26, 2016

DIY - recovering an old saddle pad

I love saddle pads, but I rarely buy them. We have so many of them that, despite being 10 years old, are in pretty good shape. No tears, no holes, just some loose piping. However, they're sad and faded, and I'm more than a little bit tired of them. So I decided to pull some fabric out of my (terrifyingly large) collection and see what I could do about giving the pads a new look and some new life.

(If you're looking to make a saddle pad completely from scratch, try this blog post for instructions. It also has slightly more detailed instructions on assembly than this post, so you might use it for reference.)

Sad, faded pad with loose piping, but otherwise sound and serviceable.

First, take a seam ripper and pull off all the piping and trim. If you've ever wondered what's in the middle of most saddle pads, it's a piece of 1/4 inch open cell foam (the yellowish stuff peeking out from the edge) - same stuff that's in your couch cushions. This is why most pads don't breathe very well.

Next, cut two pieces of fabric to roughly the right size. Be sure to leave about 2 extra inches on each piece over the spine area.  Pin your cover fabric to the pad using LOTS of pins - the goal is to hold the fabric to the pad while we quilt it. Embiggen pic to see all the pins I used.

Use a straight edge and some chalk to mark the diagonal quilting lines going one way...

... then sew them down. Mark the lines going the other way, and sew those down too.

Once you've quilted the fabric on, run a line of stitches around the outside edge of the pad to make sure the fabric doesn't bubble or gap.

Snip away the excess fabric. It's starting to look like a saddle pad! 

Next, we need to connect the two halves of our fabric over the horse's spine. Lay one side down flat (the one I'm holding on the left is the side I chose to lay flat - at the bottom of the pic, you can see how it's been tucked under the other piece of fabric)...

... then fold the other side over top to cover up the edge. You can see at the top of this pic, I've folded over the edge and pinned it, but I haven't done the part at the bottom yet. 

Here's what it looks like all pinned in place. Use LOTS of pins!

This is Jen. Jen is an idiot and used a medium weight needle. Don't be like Jen. Use a heavyweight needle so it doesn't break when going through your saddle pad and heavy fabric. 

You can run a second set of stitches down the spine if you want - I did it so it would look symmetrical, but it's not necessary. Here's what the spine of the pad looks like after everything has been stitched down. 

Next up, the edging! I used double fold bias tape in a complimentary color. Bias tape is awesome because it's been cut on the diagonal (bias), which allows you to bend it neatly around curves. 

Exhibit A: tidy curve with no wrinkles or folds. Once again, use lots of pins to make this work well. If it's wrinkling, use more pins. Seriously. And go slow when you're sewing it down.

Here's what the corner looked like after it had been stitched down and all the pins were removed. 

Starting to look like a saddle pad!

You might be wondering what the back of it looks like - not so great. If you do much sewing you'll realize that I cheated when I sewed on the bias tape. I should have sewed it from the back side first, then stitched it down from the front. I did it all in one step because I'm lazy, but you can see that means the back doesn't turn out as nice. Whoops. Check out this post for better instructions on how to sew on bias tape.

Next up, the piping! Use a seam ripper to make a very small hole in the stitching on your edging, then stuff the end of your piping in the hole. Tucking the end of your piping under your edging will prevent it from fraying.

Sew that sucker down, then use a big zig-zag stitch to go over your piping all the way around.

Here's what it should look like when you're done - you can just barely see the white thread I used to zig-zag over the piping to hold it down. You can also see the little lump in the edging that's the end of the piping.

Note that I chose not to put piping under where the girth goes. That's a high wear spot and I didn't want the piping to get rubbed. 

Annnnd, the finished product! 

I love the fabric I used for this and was pretty happy with how the whole thing turned out - as you can see, I pimped out a bonnet to match. One of the things I like the most is that this ensemble will go with a variety of outfits for the rider, if you're into that matchy-matchy thing. As part of our Spring 2016 collection, you should see Courage sporting this look on Aimee's blog... I wonder if she'll pair it with blue polos, or cream? ;)

Monday, January 25, 2016

My eyes are bleeding! (ROOD fail)

There are some folks out there who are always turned out in lovely matching riding sets - polos or boots, saddle pads, browbands, and bonnets for the horses, complimentary clothing for themselves. They always look so tidy and professional, I admit I'm a bit jealous.

Then there's me.

It's not that I TRY to look bad, per se. It's not even that I don't have clothes that would be complimentary with certain saddle pads and browbands (I don't do boots/polos or bonnets, that would just be more things for me to mismatch). It's just that sometimes I make poor life decisions.

Take this lovely ensemble I wore for yesterday's lesson. I love this saddle pad, and I think the fleece is pretty awesome too. However, when combined, they make for a somewhat unsavory set:

Admit it, you WISH you could pull together an outfit this awesome. I'm pretty sure Taran was so embarrassed by my poor choices that he simply couldn't concentrate during yesterday's lesson.

Then there's the scenario when I come in from riding and change into my favorite comfy fleece lounge pants but leave my riding shirt on. This can either be nominally OK (if I'm wearing a solid blue or green shirt) or horribly scarring for anyone who sees me. 

Hubby was too traumatized to let me actually put this set back on for pictures. And this is a man who is partially colorblind!

This show season, I'm looking forward even more truly appalling outfits. You see, if you're wearing a coat and stock tie, it doesn't matter what sort of shirt you have on underneath - nobody can see it. And I got several Kerrits Icefil shirts for Christmas (these are awesome, btw) with some really wild patterns. With a coat, stock, and white breeches, you'll never know about my fabulously loud shirt. BUT... when I'm just walking around between rides, I'll be sporting these shirts along with my favorite pair of coveralls over my white breeches. The result will be something like this:

I am fairly sure this is what dressage princess wannabes are all wearing. 

Are you more the type to have lovely matching ensembles? Or do your outfit choices suggest a certain lack of je ne sais quoi?

Friday, January 22, 2016

How much does a USDF rated show cost?

This year, I'm trying to be a responsible adult and pretend to budget for shows. Ok, just kidding, I don't really want to know how much money I spend on this sport, but I thought I'd do the math once just to point out to hubby that it's less expensive than driving halfway across the country for a jousting competition. Priorities.

I've signed up for a USDF rated show in March, with Taran. It's in Houston, about a 2.5 hour drive from me.

Per-day costs
  • Classes: $40/each, I show 2 per day (USDF allows up to 3). Add $10 for GAIC qualifier and $8 for SWDC qualifier, so add an extra $18 per day (highest test at each level is the qualifier, and I always sign up because I WILL go to the championships if I qualify, dammit). So total of $98 for two tests for one day.
  • Show office fee: $35/day (can be up to $50/day, depending on the show)
  • USDF drug fee: $16/day
  • Total for the weekend: $298, would be $36 less if I didn't do the qualifiers.
I do not pay any non-member fees, but those are $30/day for USEF and $25/day for USDF, for EACH rider/owner/trainer who is not a member. So while having those memberships isn't cheap, it's worth it because of the non-member fees.

Weekend costs
  • Stall fee: $120/weekend, plus $12/bag for shavings (I get 4 extras because Paddy likes a fluffy stall for his beauty rest, so another $48, and no you cannot bring your own)
  • RV hookups: $50/night (x2 nights). It's not as expensive as a hotel room, but it's also not cheap. However, I do love having the ability to get food and take a nap right at the show. 
  • Total for the weekend: $268, would be less if I didn't get extra shavings or have RV hookups.
Others
  • Hauling: I have my own rig but let's face it, owning a rig is not cheap. I calculate that it costs me a minimum $1.00 per loaded mile every time I haul with it. If you're thinking that's a lot, it costs about $75 to fill it (38 gallons of diesel, and diesel is a whopping $1.79 right now), $80 each for 2 oil changes per year, roughly $500 in trailer maintenance per year (bearings, lights, and new tires every 4 years or so), and I just paid $2000 in repairs on my truck. So $1.00/mile is pretty reasonable if you consider the real costs of owning a rig. The show is about 300 miles round trip. So that's $300 to haul. Obviously in-town shows are cheaper for hauling, but they're still a good 30 miles from home, so the cost isn't negligible. If you want to cheat on this cost and just figure out fuel costs, it's probably $75, since I can make it there and back on 1 tank. 
  • Food: We usually bring most of our own food, but go out on Saturday night for dinner. So including groceries and one dinner out, about $100 for the weekend for 2 people. It seems expensive but do you know how much brie cheese and cider I can put away in a weekend???
  • Total for the weekend: $400, would be MUCH less if I didn't do the $1/mile math or eat out. But I like food and I'm trying to be realistic about the costs of owning a rig.
Expenses you might have but I don't:
  • Training: I've only had my trainer at one show this year, and our schedules didn't really work out for her to help me warm up. So no training fees, although they'd be $75/day if I did.
  • Tack stalls: There are some shows where I would love to have one of these, but I'm cheap. They're about $110/weekend.
Bottom line:

USDF rated shows aren't cheap. Even if you JUST include classes and stall fees (like for an in-town show), it's $466 (tack on an extra $80 if you choose to do the 3 rides per day that USDF allows). Add in the RV hookups, hauling, and food, and you're up to... gulp...

$966

Dear hubby, I hope you're not reading this. :D

Thursday, January 21, 2016

60 seconds of awesome (aka Paddy trotted!)

Yesterday, my vet cleared Paddy to trot under saddle. We've been a bit conservative with his rehab because he's been struggling with a proper landing on his RF (remnants from that damn thrush), but he finally seems to be making progress.

So yesterday, after a long walk warmup, we trotted. He felt great, although somewhat put out that I actually expected him to do something OTHER than walking.

Because you can never have enough Haffie ears.

Vacation's over, buddy!

Wednesday, January 20, 2016

A day at WEF - 2016 Global Dressage Festival

Last weekend, hubby and I took a long weekend in Florida. My big request was to go to the Friday Night Freestyle at WEF - I've never been to Wellington, and there were something like forty-three Grand Prix riders, including Laura Graves and Michael Klimke. Plus, I have this secret desire to go ride in the National (USDF) classes at WEF one day, and I wanted to scope out the facilities.

Suboptimal weather for WEF

Alas, the weather didn't cooperate. We landed in Miami to grey skies and rain. I started snapping pics as soon as we drove past the Wellington city limits -  there is literally not a blade of grass out of place there. Unfortunately, all the fanciest places are in gated communities, so we could only see the entrances.


Plebians like us are not allowed.

Despite all the fanciness, there's apparently a problem with zombies in Wellington. 

The dressage area of WEF was beyond gorgeous. The arenas were meticulously maintained and had Paddy's favorite waxed sand/felt footing. In addition to the FEI show ring, there was the FEI warmup arena, three covered warmup arenas, and three arenas for the National classes. 

PSG ride in the FEI arena.

National arenas

THREE covered warmup arenas.

There were lots of vendor pavilions, but unfortunately due to the weather, most of the vendors weren't around. My poor hubby was particularly bummed, because he'd wanted to try out some Custom Saddlery saddles, but the saddler wasn't there. Our bank account is safe for a little longer!

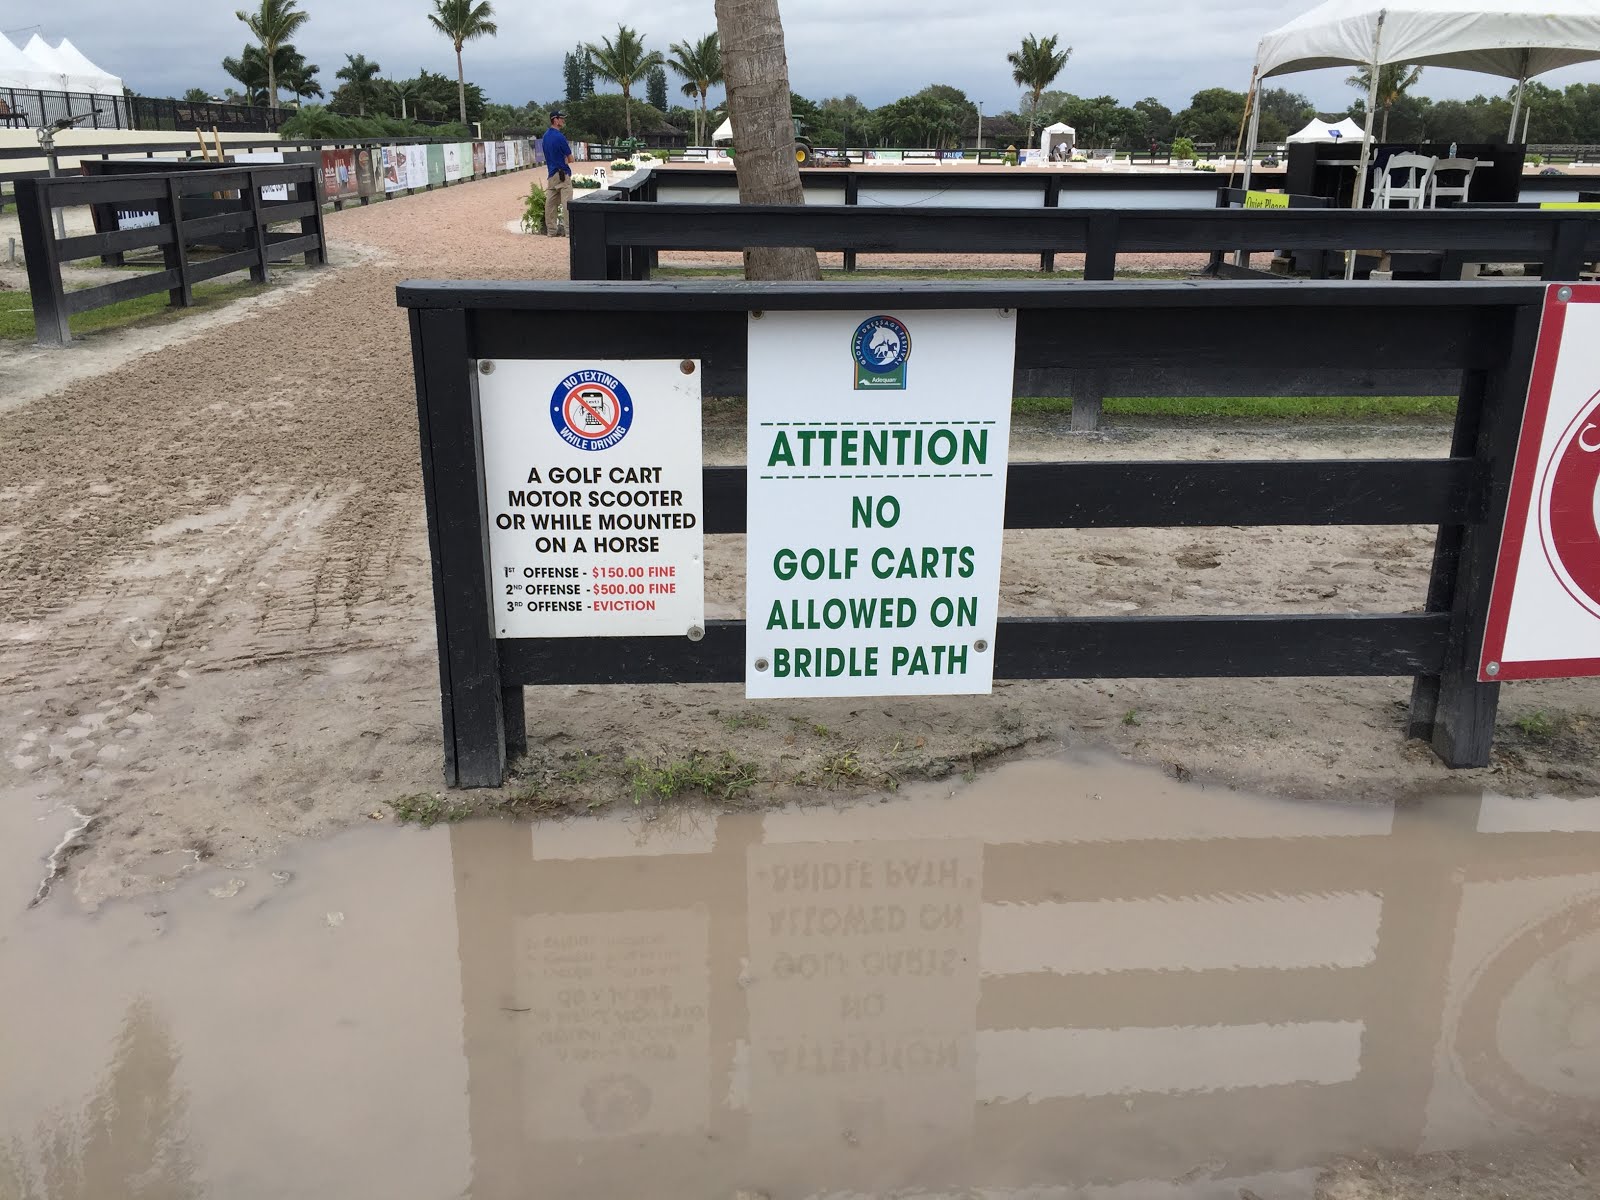
Absolutely NO TEXTING WHILE DRIVING GOLF CARTS. Seriously, they fine you.

We watched a few PSG tests, watched other riders practicing (first time I've ever seen rollkur in person), and then wandered around for a bit to scope out the barns. Did you know that FEI barns are quarantine zones? You needed a wristband to get in, which we obviously didn't have. So I couldn't go smooch Verdades' nose or anything. Bummer.

 
FEI barn stall (but outside of the quarantine area)

Fancy topiaries are a Thing.

We were getting hungry and the weather was looking even more sketchy, so we decided to leave the showgrounds and get lunch. From the window of our restaurant, we watched this squall line blow in:

This storm line spawned something like 5 tornadoes.

After lunch (and the storm, which fortunately only caused a few downed limbs where we were), we headed over to the On Course Consignment Shop, which was highly recommended by Lauren. There, we proceeded to spend 2 hours shopping for Things.

ALL THE THINGS.

I did not buy these beautiful Petrie boots. Fortunately they were just a little too short and too wide - and at $950, probably not that much of a deal.

I have no idea why my husband was looking at shads.

Believe it or not, we didn't buy a single thing in that store. Nothing. There were a few items I was looking for, but the didn't have them. The bank account breathed another sign of relief.

After shopping, we decided to take a nap in the car since we'd been up since 3 am. We caught some z's, then got some sushi for dinner, and headed back to the show... only to find this sign:

NOOOOOOOOOO!

Because of the tornadoes and rain, they cancelled everything at WEF Friday night. Everything. I won't lie, I was pretty disappointed. However, we walked over to the barns just in case there was anything going on, and were treated to a few minutes of Michael Klimke riding his GP horse in a snaffle. 

No really, that's him. Promise.

I especially liked how he finished his ride with a nice, forward trot and canter on a long rein, with lots of big pats for a job well done. You are an inspiration, sir.

Given that everything was cancelled, we headed back to the car to drive to our hotel. In the parking lot, we saw this little guy:

A fox!

So while it wasn't how we expected or hoped our day at WEF would end, it was fun nonetheless. I can't wait to go back!

Thursday, January 14, 2016

Close call

Yesterday afternoon, I got the call every horse owner dreads. Cash was colicking, they'd gotten him in the trailer but he was down, and they were on their way to the vet but it didn't look good.

Quite possibly my favorite picture of us. Photo courtesy of Lauren.

I waited by the phone for an hour for news. When I finally got the call, the prognosis was mixed. He'd been choking, but deep in his chest, which was why it had presented as colic. He'd managed to clear the choke on his own in the trailer, but they had pulled 9 liters of reflux from his stomach and his blood numbers weren't great, so there was a very real chance that he would colic. We'd just have to wait and see how it played out.

I managed to sit on my hands for another four hours, after texting the people I knew would be most concerned about him. Hubby and I talked about how far we were willing to go with treatment if he did end up colicking. I did the math - I've owned Cash for 20 years, and in that time he's probably been to the vet at least 40-50 times for colic*, and the majority of those times he needed IV fluids to re-hydrate and pull through.

Luckily, by 9 pm he was eating, drinking, and pooping, so we didn't have to make any decisions. He stayed overnight for surveillance, but is on his way back to Paint Creek Ranch (and his Reddums, who was apparently looking for him last night) this morning.

Visiting last summer. He looks pretty good for 27!

Because of the excellent care and attentiveness from the folks at Paint Creek Ranch, Cash has managed to dodge another one. I cannot thank the staff there enough for taking such good care of him and getting him to the vet so quickly. Maybe he'll make it to 28 after all!

* He's a chronic colicker and has had this problem since before I got him. He doesn't have ulcers, is on nearly 24/7 turnout with his BFF Reddums, gets his feed soaked, etc. etc. Our vet suspects an internal problem, such as lipomas, but it's impossible to know without opening him up.

Wednesday, January 13, 2016

SPOOK AT EVERYTHING

Sunday, I had a lesson ride on Taran. I'll have to blog about the ride later, because while it was awesome, it was also interrupted at random points by spooking.

Here's the short list of Things We Spooked At:

We had to leap this DANGEROUS SHADOW every time we went over it. Thank goodness his mom doesn't want him to be an eventer.

There were HORSE-EATING ALLIGATORS in the bottom of this pot. Also those poles were dangerous.

C is for courage, of which Taran has none.

I got a clean flying change as we spooked away from the PILE OF JACKETS MONSTER. (Alas, I did not get a change back.)

I don't even know what's scary about this, but there's clearly something terribly, terribly wrong with it.

This entire corner is terrifying. The whole thing, all of it. TERRIFYING. Please note that there's actually nothing there except a CORNER.

More horse-eating flowers in pots.

On the bright side, Taran gives plenty of warning when he's going to spook, and his spooks are kind of a joke. On the not-so-bright side, there are dressage letters (often with flowers) at shows. Eeeek?